Pin it!

Follow Me on Pinterest
Showing posts with label DIY. Show all posts

Wednesday, June 5, 2013

Tractor Party

It has been a while since I have shared something crafty (my bad). Eat your heart out…here are a few photos from William's 2nd birthday party. I'd like to mention that we pulled this off one week after moving to the farm. I mean, how could we not have the tractor themed party at the farm? If you like what you see, please visit Memorable Designs' Facebook page or Etsy shop.

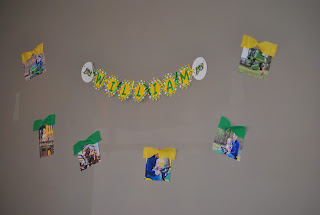
I made a banner for our mantle that used the same pattern as the invitations (you can view the invitations on Etsy). I made the cutout shapes resemble wheels with treads in keeping with the theme.


I kept his name separate to use in another area, on our kitchen wall, next to the food table. I printed out about a dozen pictures of him on tractors and hung them up…simple, but cute!


I had these cute mini galvanized buckets and added chalkboard labels with farm-themed words for forks and spoons.


These baggies had rice krispie treats that the birthday boy helped make. Toppers read "Have a Hay Bale for the Ride Home."


For favors I did acrylic cups for each child with all different designs and their name. William got a green one since he was the birthday boy. I did everything from a crab, airplane and dinosaur to a ladybug, chicken and butterflies.


I also used vinyl to customize these little green buckets with the tractor theme. You can also see one style of food tent cards I made. I used a handful of complimentary patterns for the backgrounds.


And a family picture…on the tractor of course!

Wednesday, April 3, 2013

Closet Facelift

On the same day that the carpet installers were at the house, I decided a little closet facelift was in order. All of the closets at our "old house" had white wire shelves. That is not the case here. This is the closet in the master bathroom upstairs. It is an obscenely large bathroom (no photo to share now) in need of several updates, but with a smaller size closet. There is also a similar size closet downstairs adjacent to the full bathroom on the main floor which I am grateful floor. Right now, that houses everything child related since it is near their bedrooms and extra towels that are not under the sink. Note: without locking bathroom cabinets, the only thing safely stored in them are towels! Back to the closet...


The closet shelves were in need of new paint. As you can imagine hair products, lotions, etc sitting there over the years. Well, I didn't want to paint because that would mean sanding, cleaning up dust, etc and we will probably paint the closet when we paint the bathroom down the road. 


So, I used the next best thing, a material I am very familiar with…Vinyl! I purchased two large containers of this distressed chevron vinyl at JO-Ann's back in the summer for $2.97. The rolls were huge. Time to use them!


I simply measured the shelves, cut the vinyl and adhered it to the shelves. WaLa!


Now the shelves look updated, clean and it was a much quicker process than painting.

Monday, April 30, 2012

William's Birthday Party Crafts

Back to William's 1st birthday party!! I did a quick photo-filled post soon after his party, but I can't resist sharing more, including my DIY projects.

Since I went with the little red wagon theme (don't ask me why, but I decided on it probably ten months ago) I accented with light blue so it wasn't so picnic-like. For drinks, I borrowed aqua mason jars from my in-laws that were once used as centerpieces at my sister-in-laws wedding. I tied ribbon around the neck of each jar and also added red and white striped straws for the lemonade. 

Easy factor: 1  Time factor: 1

These super cute wagon cookies were practically the only thing we didn't cook or make ourselves. I contacted Brittanie at Snickety-Snacks because I had tasted her cake balls before and knew she made super sweet cookies. She even put each cookie in a bag for me and I created the scalloped edge bag tags. The cookies were favors for the parents kids and then the ones without names said "Happy Birthday William" and were for the rest of the guests. I actually didn't use my Cameo to cut these out because I wanted some help, so we used a scalloped hand punch that I also used for his cupcake toppers at last year's Baptism.

Had to make the scallop the right size and put each child's name inside before printing. Also punch hole in top for ribbon.
Easy factor: 2  Time factor: 2

I made a party-color-themed wreath using plastic tablecloths too! This was the most involved project because of the size of the wreath itself. I did the same thing as with my Christmas fabric wreath and even hung it in the same place in our dining room/kitchen since that's where most of the party action was happening. I am also guilty of it still hanging up!

Easy factor: 2  Time factor: 4

Since the "trend" nowadays is for kids to have their own smash cake or cupcake, I made a small cake for William using what else, Funfetti cake mix and cream cheese frosting. My friend had the small cake pan from her daughter's 1st birthday a week earlier and I made two layers since that was how much batter I had. I know it is a bit tall. I used red and blue sprinkles and put the little red wagon on top. Do you know how long it took me to find that wagon…?! 

But the real "craft" here is the plate. I bought a plain white plate and then cut the letters with my Cameo. Because of the curve of the edge, I placed each letter by hand which took a little longer than the standard method using transfer tape.

Easy factor: 2   Time factor: 3
(Factors based on having a Silhouette Cameo)

Since I already had this cute tin bucket from Kirkland's, I added William's monogram and it immediately looked customized for his birthday. I also did the water bottle labels. I designed them using Silhouette Studio and then sent it to my printer. To decide on the measurements I simply measured the original bottle label and matched it. The text said "William is One" then there was a wagon inside a blue oval and then "Happy Birthday!" I cut each strip of label out, covered it with packing tap and then adhered it to the bottle.

Easy factor: 2 Time factor: 3

I did two fabric projects for the party, a highchair banner (which fell while he was eating his cake) and pennants that hung in the dining room. I used coordinating but not matching red/white and blue/white polka dot fabrics. The pennants were each 9 feet long (the length of the store-made bias tape) and I cut the highchair one to be the right length for our particular chair. I didn't have any bias tape at this point so I used thick red/white ribbon I had on hand. I did an easy applique for the number one on the center pennant. I loved the whimsical nature of the pennants.

Easy factor: 3  Time factor: 4

(Post party pic to see the flags. You can also see his banner!)

And finally is my entry sign. I used my Cameo to cut the blue circle, the wagon and do the lettering with my sketch pens. The white backing is made of folded coffee filters (I might do a separate post on that). I wanted it the whole house to be connected with William's birthday theme :)

Friday, April 13, 2012

Bridal Shower Gifts with my Cameo!

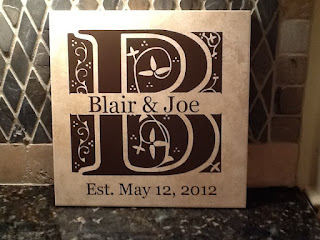
To stay true to my word, I want to share all of the Cameo-created gifts I made for Blair's bridal shower. The first is for their kitchen and it is a split letter tile monogram with their names (obviously) and their wedding date. I chose the tile and the vinyl to coordinate with their kitchen, but also to compliment any future kitchens they will share together. Blair purchased a large frame stand for it and may even have it on display at her wedding…sweet!


The next item is for her ceremony. Blair's cousins children are in the wedding and the two young boys will be walking down the aisle together. While helping her brainstorm about what they could carry (pennant flags would be used as light sabers) she found a version of this idea and asked me to create it for her with her colors. During the processional, each boy will hold a ribbon so the guests see "Here comes the Bride." They will show the opposite "Just Married" side during the recessional and Blair and Joe could also take pictures with it.


The next gift didn't completely make it from BWI to ATL in one piece, but 75% of it did! I made a set of 4x4 tile coasters for Blair. They have black felt on the back to prevent scratching any furniture.


And finally, the most personal gift -- monogrammed stationery! I made a set of 20 or 25 monogrammed notecards for Blair (the A stands for Amanda, her "real" first name) in a few different colors. I did the majority in black to make it traditional, but spiced it up with some navy, purple and green. I stayed away from orange and pink although I was tempted. I decided against doing a couple's monogram for this gift because I wanted her to be able to send the notecards for non-wedding related things, and notes that were only from her.


So, what do you think??!!


Tuesday, April 10, 2012

Bridal Shower: The Decor

The weekend of St. Patrick's Day I hosted a bridal shower in Atlanta for my dear friend Blair with her sister and mother at Blair's house. I wanted to share the personalized decorations with you and in another post later this week I will share her gifts, all of which I made of course :).

Blair's sister Kristin, Blair the bride and me

Originally, Blair's mom thought a Breakfast at Tiffany's theme would be fun…guests in black dresses, hats and pearls with tiffany blue, white and black decor. In the same email she also commented on how Blair would probably like everyone to come dressed out of the movie "The Help," pretty sundresses, etc. So, we ended up combining the two and went with the sundress apparel and used tiffany blue and shades of purple (her wedding is monochromatic purple).

I spent January and February making about 25 invitations by hand. I used my Cameo for all of these projects. I thought the scalloped edge card was feminine and I designed it to fit in square purple envelopes I had ordered from Paper Source. By the way, why do square envelopes cost more to mail? I think USPS is profiting from the wedding industry! To make the plain white wedding dress look better, I added some small adhesive crystals randomly on the skirt and tied a coordinating ribbon around the waist of the dress. I wrote out the invitation text on the back of the flat card by hand because I had not yet ordered the Silhouette sketch pens. Those things are wonderful and I wish I had used them.


Now onto the actual shower…..
Blair's sister Kristin came up with the idea to give out wine as favors to our guests. Once we bought the wine at our favorite stop, Trader Joe's, Kristin removed the labels by soaking the bottles in the kitchen sink and just rubbing off the labels. Blair's dad got in on the fun by cutting out the adhesive labels, designed by Kristin, with a paper cutter before she applied them. I made the purple and tiffany blue wine bottle hangers to add a pop of coordinating color. I am glad I made a few different styles because I used the cutouts from some as dresses on the other which really made use of everything I had cut.


We displayed the wine bottles on a table underneath a window off to the side of the kitchen with some beautiful purple flowers arranged by the mother-of-the-bride. The tablecloths were actually from my baby shower in Connecticut last year and my mom had extra and since they coordinated, we used them!


I made a "Congrats Blair" banner to hang across the fireplace where I assumed the bride would sit to open her gifts. I used the same paper as the invitations and used thick gold sparkle letters since her wedding colors are purple and gold. I used a scalloped edge for the background to coordinate with the invitations once again and because it is feminine and springy. Did you know I make custom banners for clients? Come check out some examples on Facebook and "Like" my page…I'd love to talk with you about a custom order!


For dessert we had ganache filled chocolate cupcakes and one of the bridesmaids decorated them all different. I took one of Blair's cake stands and tied another tablecloth around it with some tulle we had on hand. Don't get me wrong, the cake stand was lovely colors, but it clashed with the look I was going for ;).


Another simple thing I did was fill the chine cabinet with framed photos. On the morning of the shower I asked Blair to go around the house and collect photos of her and Joe for me to put on display. Since guests sat in the kitchen, dining, and living rooms, I thought it would be a nice subtle touch to display more photos of them in the dining room.


Monday, March 5, 2012

Spring Bunting

It is 12:30pm and I just finished a cute and quick 30 minute project. This week's Made by Me Monday was actually made on Monday…fun.  I figured since William is at Mother's Day Out I would take full advantage of my time alone and do a craft instead of clean. Much better option, right? In an effort to add some spring to our house, I went into my fabric box and cut some triangle pennants.


I did not measure them, just eyeball-ed it. I recently made precisely measured pennants for William's upcoming birthday party so I knew I wanted these to be smaller. Thats the best "measurement" I can give you :) I also cut two long thin pieces of scrap fabric to act as bias tape. Then I sewed it all together.

Wa-la! Simple, but sweet springtime bunting for our entryway (or dining room or wherever I decide to keep it). This may also be the only way I am permitted to decorate with pink!


Please ignore the random stuff on the table. Working on William's 12m frame and transitioning from Winter decor to Easter/spring/birthday!


Monday, February 27, 2012

Painted Nightstand: Made by Me Monday

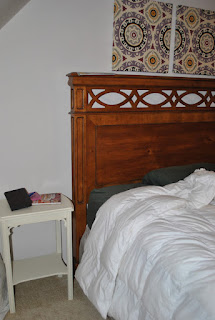
We don't have night tables in our bedroom (or end tables in our living room for that matter). We are the type of folks who don't like alot of furniture, but enjoy the open space instead. I decided to look for complimenting, but not matching nightstands for the master bedroom a while back, but it took me a pretty long time to find something. I found the table below for $10 at Chartreuse & Co., a monthly area crafter flea market (also featured in Southern Living).


I stopped by our local hardware store to buy a sample size container of paint…but walked out with a better deal. The owner let me go through all the Benjamin Moore testers he has and take whatever I wanted for free. Apparently Benjamin Moore didn't use UV containers so the paints did not match the true color, so they were discontinued…a benefit to crafters like me!


These are the colors I narrowed it down to. I really thought I wanted a colorful table.


The color concept failed me. It looked horrible. I don't think the color was "bright" enough, it looked way too country for my liking. So, I painted it black and it looked perfect! I hated the blue so much that I didn't even get out the camera for a picture.