Pin it!

Follow Me on Pinterest
Showing posts with label sewing. Show all posts

Monday, March 5, 2012

Spring Bunting

It is 12:30pm and I just finished a cute and quick 30 minute project. This week's Made by Me Monday was actually made on Monday…fun.  I figured since William is at Mother's Day Out I would take full advantage of my time alone and do a craft instead of clean. Much better option, right? In an effort to add some spring to our house, I went into my fabric box and cut some triangle pennants.


I did not measure them, just eyeball-ed it. I recently made precisely measured pennants for William's upcoming birthday party so I knew I wanted these to be smaller. Thats the best "measurement" I can give you :) I also cut two long thin pieces of scrap fabric to act as bias tape. Then I sewed it all together.

Wa-la! Simple, but sweet springtime bunting for our entryway (or dining room or wherever I decide to keep it). This may also be the only way I am permitted to decorate with pink!


Please ignore the random stuff on the table. Working on William's 12m frame and transitioning from Winter decor to Easter/spring/birthday!


Sunday, July 24, 2011

Project Update!

I am pleased to say that I finished some of my projects!! My darling husband took WM out for a few hours yesterday to do manly things (Home Depot and lunch at Roy Rogers) so I could bond with my sewing machine which I sadly had to disassemble and put back together once it started messing up stitches.

My top priority was #5 and I am happy to say I finished it three days before my goal date. But...I can't share the finished project because the wedding isn't until next weekend and I don't want the bride to see it in advance!

Project #2, new burp cloths, was next and that is when the sewing machine drama happened, but I finished!


And finally, I did start project #3 but haven't put the snaps on yet so I will wait to share those. All in all, a productive afternoon!!


Monday, July 18, 2011

Projects in the Pipeline

Right now I have several projects in the pipeline, but none completed to share :(. Surprisingly, or not so surprising if you know me, they all involve fabric. Here is what I am working on so you can hold me to it:

1. Three new pillows with contrasting corded trim for our living room (Goal: on the couch Labor Day)
2. Burp cloths for WM. All the fabric is purchased, washed & ironed (Goal: before 7/26)
3. Bibs for WM. New idea since I saw it on Creative Mommas and decided WM needs larger bibs, but the next size up in store are huge (Goal: When I finish the other projects :) )
4. Burp cloths as gifts. Two friends recently had girls and I want to make them some gifts! (Goal: Mid-August)
5. Wedding gift for a July 30 wedding (Goal: MUST be done by 7/24 eekk!)

Wednesday, June 1, 2011

New Pillows!

My home now has some updated summer pillows thanks to this quick tutorial over at A Pretty Cool Life. Cheryl said it takes ten minutes, but it took me about twenty. Why is it that cutting and pressing always takes longer than the actual sewing part?! Let's just say I learned my lesson in the past when I wasn't careful on these steps and had to start over. So I guess that is why I am so careful about it now!

I actually made two sets of pillows: one for the rocking chairs on our porch which originally had this pattern, and a new pair for our couch which I just completed. I even made a pair for my mom's living room while she was in town!

The tutorial I used this time was even easier than the one in my previous post because it is only one piece of fabric and you only sew two short edges (the flap) and two long edges. I'm going to let you visit the original tutorial for more details, but here are some of my photos.


Friday, April 22, 2011

How I Stay Organized

Kelly over at Kelly's Korner asked how we stay organized. Since this post doesn't involve photos, I can write about it now!

My level of organization has changed dramatically in the past three weeks since I became a mom.

In the Past:
Schedule: When it was just my husband and I, all of our dates/commitments, etc were kept in my daily agenda planner which came with me to and from work everyday. I kept track of both of our travel schedules for work, potential visitors were penciled in, etc.
Food: When it comes to groceries, I kept a running list in a notebook and revisited it every week before I went to the grocery store with my coupons.
Coupons: For about three years I have kept my coupons organized in a small accordian "folder" by category: grocery, cold, frozen, personal care and household. Every Saturday the coupons get cut, organized and expired ones get thrown away.
Laundry: We have two laundry baskets in our bathroom, one for whites and the other for colors. This helps me see if I only need to do one load of laundry or run both. It also prevents me from having to sort the laundry.
Crafts: I am very lucky and actually have a craft room! I know I should share a picture of this, but right now I have all of my spring/summer clothes out in the room since I am trying to transition my closet and also pack up the maternity clothes (woohoo!). I have a large armoire in the room and the right side has shelves and it is all scrapbook stuff. Scrapbooks I have made, photos, paper, stickers, scissors, etc. The left side of the armoire has a shelf and also a hanging bar. On the bar I hang already washed and pressed fabric on hangers so I can see what I have and then I have other fabric folded in an old open suitcase along with all of my sewing notions. My sewing machine is on the shelf beneath the fabric.

Presently:
Schedule: I still use my daily planner, but it now stays open to the current week on our dining room table. It doesn't have meetings listed, but doctor's appointments and commitments to visit with family and friends.
Food: I bought a small notebook that has a shopping cart on it (genius!) and I keep my grocery list in there. I have a "Standard List" which is items I buy each week and then I add things that I need. This was real helpful when people helped me with grocery shopping when baby arrived (thank you Mom and Meghan!).
Coupons: I still cut coupons, but it isn't always done on Saturdays when the newspaper gets delivered. It is okay if it takes a few days, but my system is even more helpful now.
Laundry: Our laundry is still separated, but our son's is all in one hamper since everything is so small. I do separate it warm and cold based on what the tag says, and then I just wash the bigger pile first. My goal with his laundry is to get it washed, dried and layed out flat so it doesn't wrinkle. I have been able to put it away quickly, but even if I don't, at least it all looks good sitting on top of the washing machine.
Crafts: Same since I haven't had time to do anything sine baby arrived :)
Baby Feeding: I keep a notebook on the ottoman in the nursery to keep track of the time of feedings, diapers, and amount of feeding so I don't have to think about it. Since we are supplementing with formula, I prep a few bottles in advance by making sure they are clean and assembled and filled with purified water. That way all I need to do is mix in the formula. Since the water is room temperature, I don't need to warm the bottle (according to my pediatrician) so although I have to mix the formula with each feeding, I don't have to heat it up with hot water in the middle of the night. It has worked for us so far.

That is a little glimpse for now....

Tuesday, March 22, 2011

Taggie Toy for Baby

This is a project I meant to complete months ago, but then I got distracted, which is par for the course. If you are a mom, or even if you aren't, you may have heard about "Taggies." Apparently children like tags on stuffed animals and other toys. Funny how this reminds me of cats and dogs liking empty grocery bags more than their toys, but I will withold judgement.

I bought 1/4 yard of this bright color striped fabric on clearance and then purchased 1 yard of three different coordinating ribbons. The total cost for material was less than $5.


I went with a raw size of 13x15 inches for the fabric portion of the Taggie which is because I liked that size, it wasn't too big or too small. I didn't use batting or any other filler, just the two pieces of fabric sewn together. But, before I sewed the pieces together I cut several pieces of 4-5 inch ribbon from each of my three colors: orange grosgrain, red satin, and lime green with blue dots grosgrain.


I folded the ribbons in half and pinned them around the right side of one of the pieces of fabric and then stitched them in place. Then, I added the second piece of fabric and stitched the two together. At this point, I couldn't see the ribbon anymore because the loops were "inside" the fabric.


When I turned the fabric right side out, I went around the edge with a tight straight stitch and wa-la, project is done! I have some extra fabric and ribbon so I will probably make another one because, well, why not?!


We Did it WednesdayBlue Cricket Design, The Handmade Hog, Somewhat Simple
Hookin' Up w/ HoH, Keep it Simple Sunday

Tuesday, March 15, 2011

Table Runners for Spring

I have managed to be crafty while waiting for baby and last weekend I made two table runners: one that was a bridal shower gift and one for myself. The bride-to-be and her husband-to-be are cousins and recently purchased a large "old" home so I figured they would need some accessories besides all of the wonderful kitchen and bathroom goodies you get at a bridal shower.

I headed to Jo-Ann's and selected a main fabric (the beige with the birds) and two complimenting fabrics (the green geometric and blue geometric). I decided to make theirs 96 inches long which would leave excess if used on a 6 foot table or fit end to end on an 8 foot table. For the width, I decided to go with the width of a placemat since that looked good when I laid it out before pinning. I also decided to make both sides different so they essentially have two runners in one. The first side has the beige bird fabric in the center and one end has the blue geometric while the other has the green, and the back side is all beige bird.


For once I took the time to trace with a disappearing ink pen, the size of my blocks so I could make sure I wouldn't have to go back to the fabric store or have unsightly seams running down the center.


Sewing a table runner is very much like sewing a baby blanket except in my case, I was working with extra seams since I used a few pieces of fabric. I added an extra inch onto each measurement since I pressed a 1/2 inch seam on all edges to sew the blocks together.


Then, I laid out the fabric end to end so I could measure again and make sure I was happy with the placement. Unfortunately, I forgot to take a picture of the finished product.


The runner I made for our dining room (which acts as an everyday table) was sewn to 120 inches since we have an 8 foot barn-wood table and I wanted room for the runner to hang off the ends. I used the same blue and green geometric fabric because the "main" fabric I selected for my own runner was a green paisley and also a blue/beige floral. I wanted something that would look good in the Spring and also through the Summer since I'm not quite sure how much time I will have to make another one when baby R. arrives.


For the top side of mine I knew I wanted a specific pattern and specific size blocks which I measured out. The back side ended up being a free for all based on the amount of fabric I had left, but the blocks are larger and still the same fabric.


In our dining room I set out my go-to set of glass pillars with a bowl for candles at the top and two additional pillar candles. These are the same glass pillars I used for Valentine's Day and although I intended to fill them with pastel Easter candy, I decided against it since I am trying not too indulge in too many sweets.


Saturday, March 5, 2011

Fashionable Burps

Baby spit-up can be gross. Baby spit-up can be messy. But who's to say that parents can't make it a little less distracting with an embellished burp cloth?

Although our baby isn't here yet, I am already a fan of the Gerber 6-ply cloth diapers as burp cloths. Readers of this blog also know I love to sew as one of my hobbies so I found some real cute unisex fabric and started my project.

For the burp cloths shown in this tutorial, I actually used outdoor fabric which has a great canvas-like texture, beautiful patterns, and wonderful colors. I also found it to be more obviously unisex since it isn't meant to be gender-specific like nursery and children's fabric. Jo-Ann's Fabrics had this fabric on sale 50% off so it was very reasonable and I only bought 1/4 yard of each (enough for two burp cloths or extra for another project).


Like all sewing projects, I pre-washed the burp cloths and fabric. When I was at Jo-Ann's, I made sure to buy fabric that could be machine washable and safe to iron so everything was ironed after it came out of the dryer.

I looked at a few different options and decided that I liked the way a piece of fabric 6.5 inch wide looked best. I cut all my fabric to a size of 7.5 x19 inches to allow for a 1/2" hem on all sides. I pinned a hem and pressed the fabric to make machine stitching easier.


Once pressed, I pinned the fabric to the burp cloth and used a zigzag stitch on all four sides.  I LOVE making these and wouldn't be surprised if my baby has a large stash of them. Also, don't be surprised if we are friends in real life and you get some as a gift for your new baby. I am looking into selling them at a few community events in my town. What do you think?


Wednesday, January 26, 2011

Making the Most of a Rookie Mistake

(Before you read this, please remember I am still on the "mom-to-be" side of the fence and learning the ropes).

Several weeks ago I went into an unfamiliar Babies R Us and pretty much tried speaking to the salesperson in their native language, which isn't my own, to find plain cloth diapers so I could make some cute burp cloths. I had registered for some and had seen them before, but lo and behold, I got home and had bought the single layer ones which could be used to strain yogurt as far as I'm concerned! Frustrated, and definitely not in the mood to go back I washed all of the diapers anyway and then decided how to make the most out of my mistake.

I pressed all of the single-ply diapers after they were dry and hung them in my sewing closet so I wouldn't have to unroll the edges again. I was invited to a baby shower and decided that I could in fact still make basic cute burp cloths, it would just take a few extra steps.

So, using two diapers, I lined up the edges as best as I could and then folded them under to pin.


I used a tight straight stitch close to the edge of the fabric to make it as clean as possible.


I pulled out the Winnie the Pooh fabric I had purchased, in keeping with the theme of their nursery, and decided how wide I wanted to fabric to be. I didn't want it to cover the cloth completely, but did want more than a small area in the middle covered. Then I measured and cut the fabric.


I pressed the edges of the fabric to help with my effort for clean lines and then pinned the cotton fabric onto the already sewn together cloths.


Using contrasting red thread and a zigzag stitch, I sewed the Winnie the Pooh sections onto each "double-layer diaper."


Hopefully the mom-to-be likes them since they are part of her shower gift.  I realize I would have saved alot of time just buying a new pack of the 6-ply cloth diapers like I originally intended, but what can I say, pregnancy has made me do some silly things :). Once I start making some for our little one, I WILL be able to skip the first few steps and get right to the fun part: selecting the cotton fabric!


The Thrifty Home

Sunday, January 2, 2011

28 Weeks

It is only fitting that my first blog post of the New Year is about the biggest and best thing that is happening to us in 2011 - our precious little baby! Although we won't meet him/her until the end of March, there have been a few things we have done recently to prepare for their arrival.


The nursery is looking great! By the way, thanks to The Creative Mommas for the shout-out on their blog about their nursery! 

The room was cleared out, also by my wonderful husband, and painted on Thanksgiving! We went with Honey Beige from Olympic's Audubon Collection because it is warm and neutral, and I have loved seeing it on the wall the past two weeks. As a side note, it is nowhere near as orange as it looks on the computer screen. You don't think a Terp would allow his child's room to be orange do you?!


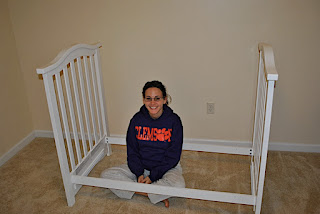
We spent some time assembling the crib the day after Thanksgiving and I love going in the nursery and just looking at it. Last week I purchased the mattress for the crib and a sheet so it looks for ready for baby now. How did I fit the mattress in the back of my small car? Read on to find out :)


The dresser came in a few weeks earlier than expected and some of the drawers already have goodies in them thanks to friends and family. We'll be using the top as a changing station once we get the changing pad and everything else that is involved.


My handy husband will be building a tall bookshelf for the nursery and we purchased the materials last week. Little Squirt already has more than a dozen books and that doesn't include our childhood books or many new ones. These were gifts from my mom, friends and a few classics from a sale.


There is also an antique family cradle in the nursery from my mother-in-law's family. There is a plaque at the headboard of the names and birthdates of babies who used the cradle, starting with my mother-in-law's older siblings more than 75 years ago. My mother-in-law, husband and his sister are also on the plaque. We aren't using it as an "everyday thing" because of safety, but you can be sure that I will take some photos in it. For the time being, our cat likes to use it as his bed when he isn't in mine.


To be honest, the only crafty thing I have done in for the nursery so far is sew some basic blankets. A few weeks ago I couldn't resist buying gender-specific nursery flannel when it was on sale for $1.29 per yard! What will I do with the boy blankets if we have a girl and the girl blankets if we have a boy? Give them to friends of course! This weekend I got busy sewing and now have four completed blankets and one nursing cover (the vibrant cotton fabric). My husband laughed about that because he said I'll really be drawing attention to myself...maybe I should buy something more simple?? I still need to buy clips and a ribbon to make the nursing cover more than a blanket, but all in due time.


The least exciting thing was my glucose test. I passed with a score of 86 which is well within the 65-139 range. Best part of this besides my body correctly processing sugars? No three hour test! I also went for a RhoGAM injection because I have a negative bloodtype and my husband has a positive bloodtype. It was "more work" than the glucose test but necessary for the health of me and baby.


On a much more exciting note, we bought a new car which we are jokingly referring to as the Squirt (baby's in-utero nickname) mobile. I met a deer on the road a few weeks ago and thankfully it ended much better for me than the deer. Most of you know I had a two-door Pontiac G5 that was a great car, but sadly had been hit a few times by distracted drivers and then hit a deer. So, we took advantage of what was left of the situation and decided to upgrade "my" vehicle now to a Chevy Equinox which is what I had been eyeing for some time.


I continue to feel pretty great most of the time, but the sleepiness has come back quickly, but still not as bad as the first trimester. My belly button still isn't totally out yet but it is funny to see that sometimes it moves when I laugh. We still have a very active baby and some of the kicks are more quick and spaced evenly. Maybe it is hiccups? The movement of the baby is changing and I feel tightening when I think he/she is moving their body around to get more comfortable. I can also feel protruding body parts which is entertaining. I can't identify them yet, but I'm sure I will be able to soon! Sleeping is rather uncomfortable since I lose feeling from my hips halfway down to my knee depending on which side I am lying on. Any tips for relief? This is a picture from new Years Eve and my shirt makes me feel larger then I am.


I go for my 28 week appointment this week right before our first baby shower (yeah!) and I hope the doctor tells me everything is right on track.