Pin it!

Follow Me on Pinterest
Showing posts with label hobbies. Show all posts

Sunday, July 24, 2011

Project Update!

I am pleased to say that I finished some of my projects!! My darling husband took WM out for a few hours yesterday to do manly things (Home Depot and lunch at Roy Rogers) so I could bond with my sewing machine which I sadly had to disassemble and put back together once it started messing up stitches.

My top priority was #5 and I am happy to say I finished it three days before my goal date. But...I can't share the finished project because the wedding isn't until next weekend and I don't want the bride to see it in advance!

Project #2, new burp cloths, was next and that is when the sewing machine drama happened, but I finished!


And finally, I did start project #3 but haven't put the snaps on yet so I will wait to share those. All in all, a productive afternoon!!


Monday, July 18, 2011

Projects in the Pipeline

Right now I have several projects in the pipeline, but none completed to share :(. Surprisingly, or not so surprising if you know me, they all involve fabric. Here is what I am working on so you can hold me to it:

1. Three new pillows with contrasting corded trim for our living room (Goal: on the couch Labor Day)
2. Burp cloths for WM. All the fabric is purchased, washed & ironed (Goal: before 7/26)
3. Bibs for WM. New idea since I saw it on Creative Mommas and decided WM needs larger bibs, but the next size up in store are huge (Goal: When I finish the other projects :) )
4. Burp cloths as gifts. Two friends recently had girls and I want to make them some gifts! (Goal: Mid-August)
5. Wedding gift for a July 30 wedding (Goal: MUST be done by 7/24 eekk!)

Tuesday, March 22, 2011

Taggie Toy for Baby

This is a project I meant to complete months ago, but then I got distracted, which is par for the course. If you are a mom, or even if you aren't, you may have heard about "Taggies." Apparently children like tags on stuffed animals and other toys. Funny how this reminds me of cats and dogs liking empty grocery bags more than their toys, but I will withold judgement.

I bought 1/4 yard of this bright color striped fabric on clearance and then purchased 1 yard of three different coordinating ribbons. The total cost for material was less than $5.


I went with a raw size of 13x15 inches for the fabric portion of the Taggie which is because I liked that size, it wasn't too big or too small. I didn't use batting or any other filler, just the two pieces of fabric sewn together. But, before I sewed the pieces together I cut several pieces of 4-5 inch ribbon from each of my three colors: orange grosgrain, red satin, and lime green with blue dots grosgrain.


I folded the ribbons in half and pinned them around the right side of one of the pieces of fabric and then stitched them in place. Then, I added the second piece of fabric and stitched the two together. At this point, I couldn't see the ribbon anymore because the loops were "inside" the fabric.


When I turned the fabric right side out, I went around the edge with a tight straight stitch and wa-la, project is done! I have some extra fabric and ribbon so I will probably make another one because, well, why not?!


We Did it WednesdayBlue Cricket Design, The Handmade Hog, Somewhat Simple
Hookin' Up w/ HoH, Keep it Simple Sunday

Tuesday, March 15, 2011

Table Runners for Spring

I have managed to be crafty while waiting for baby and last weekend I made two table runners: one that was a bridal shower gift and one for myself. The bride-to-be and her husband-to-be are cousins and recently purchased a large "old" home so I figured they would need some accessories besides all of the wonderful kitchen and bathroom goodies you get at a bridal shower.

I headed to Jo-Ann's and selected a main fabric (the beige with the birds) and two complimenting fabrics (the green geometric and blue geometric). I decided to make theirs 96 inches long which would leave excess if used on a 6 foot table or fit end to end on an 8 foot table. For the width, I decided to go with the width of a placemat since that looked good when I laid it out before pinning. I also decided to make both sides different so they essentially have two runners in one. The first side has the beige bird fabric in the center and one end has the blue geometric while the other has the green, and the back side is all beige bird.


For once I took the time to trace with a disappearing ink pen, the size of my blocks so I could make sure I wouldn't have to go back to the fabric store or have unsightly seams running down the center.


Sewing a table runner is very much like sewing a baby blanket except in my case, I was working with extra seams since I used a few pieces of fabric. I added an extra inch onto each measurement since I pressed a 1/2 inch seam on all edges to sew the blocks together.


Then, I laid out the fabric end to end so I could measure again and make sure I was happy with the placement. Unfortunately, I forgot to take a picture of the finished product.


The runner I made for our dining room (which acts as an everyday table) was sewn to 120 inches since we have an 8 foot barn-wood table and I wanted room for the runner to hang off the ends. I used the same blue and green geometric fabric because the "main" fabric I selected for my own runner was a green paisley and also a blue/beige floral. I wanted something that would look good in the Spring and also through the Summer since I'm not quite sure how much time I will have to make another one when baby R. arrives.


For the top side of mine I knew I wanted a specific pattern and specific size blocks which I measured out. The back side ended up being a free for all based on the amount of fabric I had left, but the blocks are larger and still the same fabric.


In our dining room I set out my go-to set of glass pillars with a bowl for candles at the top and two additional pillar candles. These are the same glass pillars I used for Valentine's Day and although I intended to fill them with pastel Easter candy, I decided against it since I am trying not too indulge in too many sweets.


Monday, February 21, 2011

It's All About the Bump

A few photos courtesy of my husband:


Wednesday, February 9, 2011

Stylish Blogger Award

I received the "Stylish Blogger Award" from Emily at LaForce Be With You


I met Emily as soon as I started freshman year at Clemson and we are good friends who wish we had all of this creativity and resourcefulness while at Clemson because our dorm room would have rocked! Emily shares recipes, crafts, and thrifty DIY projects on her blog

To accept this award you have to follow these 4 rules:
1. Thank and link back to the blogger who awarded you with the award
2. Share 7 Things about yourself
3. Award 8 recently discovered great bloggers
4. Contact the bloggers and inform them of the award

Okay so on to the 7 things:


1. Within 72 hours of meeting my husband, I told my mom I would marry him someday. That's right, we met on Saturday, May 6th (photo on my sidebar) and on Tuesday, May 9th at the St. Louis airport on our way to Las Vegas to celebrate my 21st birthday, I said it out loud. And my mom almost choked on a buffalo chicken tender.


2. My "house" will be in the Smithsonian Museum of African-American history. We bought a condemned house/property in 2008 one week before our wedding (crazy right?) with plans to demolish the property and build a new house since it had been vacant and crumbling for several years. Well, the research showed that it was actually a historic home (not that the County helped care for it) and we, mostly my husband, worked with the Smithsonian and we donated the original log structure they were interested in. We didn't want to ruin history, but we did want to build our new home on this land :). By the way, our house is modular. Not sure what that means -- take a look at my video and this post.

during demolition

before moving in


3. I have my own small business, Memorable Designs. I started off about 18 months ago creating video montages from old/new photos and video clips for weddings, birthdays and anniversaries. I have participated in two small bridal shows, but get most of my business by word-of-mouth..so talk it up! Everything can be done remotely. I also do full color photo books which are great for vacations, baby's 1st year, guestbooks, wedding party, etc. My latest addition has been photo pendants which have been a hit! I wear one of my ultrasound image a few times a week. Let me know if you are interested!


4. Since 2007 I have been to the Dominican Republic, Malta, Germany, Belize and Hawaii. I also traveled in the U.S. to Connecticut, New York, South Carolina, California, Georgia, Arkansas, Pennsylvania, and Florida (three different cities) all for at least two nights. What can I say...we like going places!
Arkansas

Belize

California

Germany

Hawaii

Malta


5. I was a finalist in the Connecticut state spelling bee -- twice. Once in fifth grade and once in sixth grade. The words that got me were "prevalent" and "dilapidated" (funny considering the situation of #2).


6. I'm pregnant. if you read this blog you already know that, but I thought I'd include it anyway because it is a big part of "About Me" lately. We are expecting our lil' Squirt on March 28th which makes me just over 33 weeks into the adventure of pregnancy. This blog will probably get a little more photo heavy and less text/tutorials in the coming months once baby is born since I'm not sure how crafty I will want to be. Even when I do craft, they will probably be baby-related, so I'm sorry if that doesn't interest you ;).


7. I don't want to jinx myself, but I tend to have good luck on Friday the 13th. We got word on Friday, Nov. 13, 2009 that we passed all inspections and could move into our home. On Friday, Aug. 13, 2010 we went to the doctor and saw and heard our baby for the first time!


popping champagne on night #1

taken the afternoon of 8/13/2010

I am awarding the Stylish blogger award to these 8 online friends:
1. Ashley at Make It & Love It
2. Brooke at All Things Thrifty
3. Sherry & John at Young House Love
4.  Tasha at Dot.Dot.This
5. Tiffany at Making the World Cuter
6. Stevie at Moore Babies
7. Jill at Homemade by Jill
8. The Creative Mommas (who I see have already gotten the award, but I still think they deserve it!)


Wednesday, January 26, 2011

Making the Most of a Rookie Mistake

(Before you read this, please remember I am still on the "mom-to-be" side of the fence and learning the ropes).

Several weeks ago I went into an unfamiliar Babies R Us and pretty much tried speaking to the salesperson in their native language, which isn't my own, to find plain cloth diapers so I could make some cute burp cloths. I had registered for some and had seen them before, but lo and behold, I got home and had bought the single layer ones which could be used to strain yogurt as far as I'm concerned! Frustrated, and definitely not in the mood to go back I washed all of the diapers anyway and then decided how to make the most out of my mistake.

I pressed all of the single-ply diapers after they were dry and hung them in my sewing closet so I wouldn't have to unroll the edges again. I was invited to a baby shower and decided that I could in fact still make basic cute burp cloths, it would just take a few extra steps.

So, using two diapers, I lined up the edges as best as I could and then folded them under to pin.


I used a tight straight stitch close to the edge of the fabric to make it as clean as possible.


I pulled out the Winnie the Pooh fabric I had purchased, in keeping with the theme of their nursery, and decided how wide I wanted to fabric to be. I didn't want it to cover the cloth completely, but did want more than a small area in the middle covered. Then I measured and cut the fabric.


I pressed the edges of the fabric to help with my effort for clean lines and then pinned the cotton fabric onto the already sewn together cloths.


Using contrasting red thread and a zigzag stitch, I sewed the Winnie the Pooh sections onto each "double-layer diaper."


Hopefully the mom-to-be likes them since they are part of her shower gift.  I realize I would have saved alot of time just buying a new pack of the 6-ply cloth diapers like I originally intended, but what can I say, pregnancy has made me do some silly things :). Once I start making some for our little one, I WILL be able to skip the first few steps and get right to the fun part: selecting the cotton fabric!


The Thrifty Home

Monday, December 6, 2010

Ruffle Apron

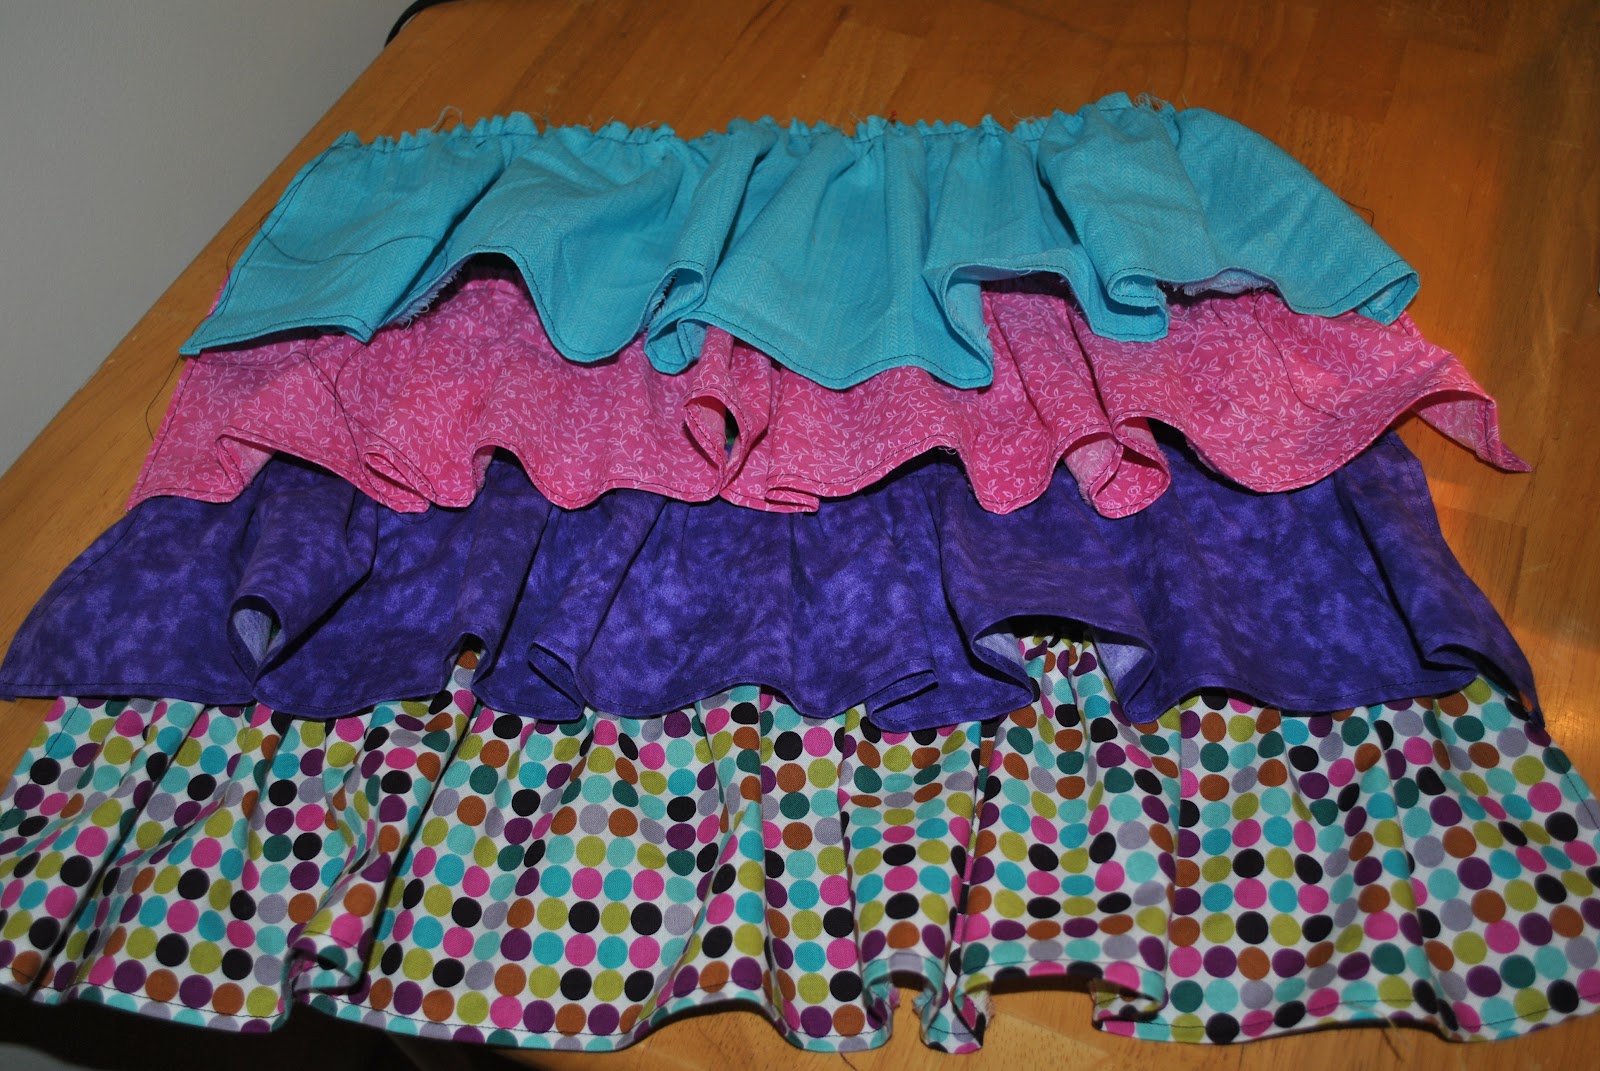
When I saw a post on Everyday Celebrations about a ruffle apron, I got quite excited. I haven't been doing too much with my sewing machine lately besides baby blankets and some basic projects, so I decided I would make two of these: a Christmas one for myself and one for my sister's 22nd birthday. I am using photos of the non-seasonal apron since to be honest, I haven't started my Christmas version.

I always find that the most time consuming part of sewing is washing, drying, removing frays, steaming and pressing the fabric. When it comes to the pinning and actual sewing, it is a breeze, but all the prep is what kills me sometimes. Just to warn you, this is one of those projects (at least it was for me).

I selected four coordinating fabrics for my sister's apron, starting with the multi-colored dot pattern. I then pulled out colors to accent them and liked the purple, turqoise and pink best. Since I only had to purchase a quarter yard of three fabrics (the purple, teal and pink ones) and 5/8 yard of the dot fabric, for a ruffle and the ties, it can easily be a very cheap project. The Christmas fabric I bought for my apron was all on sale 50% off so the materials cost less than $7 (sneak peak of my fabric below)!


Once all of the fabric was cut to the measurements here, I pressed a 1/4 inch seam on each ruffle on one long end and both short ends. The bottom ruffle (the one that matches the ties), is only pressed on one long end. Then, I used a basic straight stitch to hem the three pressed edges of each ruffle.


Actually creating the ruffle was the most exciting part since I had never done it before. I did not buy a gather or ruffle foot for my sewing machine either. All I did was increase the tension almost to the max and increase the stitch length to the max. Since I left long threads on both ends, I was able to pull on the thread and create my own ruffle by moving the fabric. This worked in my favor because I laid out the four ruffles on the bed and adjusted them to all be the same length once ruffled.


I then started the process of pinning, pressing and sewing each ruffle onto the solid back fabric, pressed into thirds so the ruffles were evenly spaced. You place the ruffles from the bottom to the top. The bottom ruffle (dot fabric) was pinned with the top of the ruffle along the bottom of the solid panel, right sides touching. Once you sew it in place (I used a straight stitch) you need to flip the ruffle over so it looks like it is laying the correct way. Press the top of the ruffle and then sew again to help hold it flat (I used a zigzag stitch). Pin the next two ruffles on the appropriate "pleat" on the backing, sew, press, and sew again so the backing lays flat. You will be sewing the top ruffle to the top of the backing with the wrong side of the ruffle touching the backing. If you do this correctly, the top raw edge of each ruffle will be hidden, except for the fourth one.

To read more detail about the process of pinning, sewing, pressing, etc of each ruffle layer, please visit the original post because it is a little bit "involved," but not as complicated as it seems.


Now, go back to the fabric you want to use for the band across the top of the apron which should match your ties and bottom ruffle. I must admit that I did try to take some shortcuts so I improvised along the way. I folded the band in half, pressed it and then pressed it at about 1/4 of an inch on all four edges. Then I pinned it into place, over the top ruffle to hide its raw edge.


I planned on using a single zigzag stitch to hold it in place, but it wasn't enough, so I added another row. at the base of the band.


I also modified the size of the ties because my fabric length wasn't quite right. They ended up being 3.75" x 36" which made the ties more narrow than the band, which I think looked nice. Copying what I did to prepare the top band, I folded each tie in half, pressed it and folded under each raw edge about 1/4 of an inch. I then closed up each band with a single straight stitch around three edges (not the folded one). Now to attach the ties to the band, I inserted them a little bit into the pocket that was created by the band being folded in half (seen below), pinned and then used a zigzag to close it up. Although I might not be explaining it the best way, this was easier for me than the original instructions which suggested turning the fabric inside out, etc.


My final product was ready to be sent to my sister in time for her birthday!!! If only she'd send me a picture of her wearing it.... :)


Making the World Cuter, Just Something I Whipped Up , Sew Can Do, What I'm Making Monday, Sew Chatty Made with Love Monday, Market Yourself Monday, Get Your Craft On, Whatever Goes Wednesday, We Did It Wednesday!, It's Sew Stinkin' Cute, HoH, Frugalicious Friday